Side Wall Radon Mitigation Technique in Maryland

Val,
My radon remediation system finally is completed and tested. Photos are attached.
INITIAL CONDITIONS
The installation was motivated by a radon level of 40 pC/l that I measured over a one week period, several months ago. I used the Safety Siren Pro Series 3 detector. I checked this unit against a second unit that I bought, and the two detectors were consistent. This high level was measured during warm, dry weather, so the radon level may have been much higher under winter conditions.
The high level occurred inside an extension to my original basement, which I built as office space. Undoubtedly, the radon problem was aggravated by the need to dig a very deep foundation wall -- 14 feet below grade at one corner -- in order to reach solid soil below fill material. The foundation wall is concrete block, effectively providing a chimney all around the addition for radon to rise into the space. The floor slab of the space is about 3 feet below grade, and the concrete block wall extends to the top of the basement space.
The maximum radon level recorded in the original basement area was about 7 pC/l, at the same time as the reading of 40 pC/l in the addition.
The maximum radon level in the room directly above the addition was about 4 pC/l. (The concrete block wall terminates below the upper floor.)
HOW THE SYSTEM WAS INSTALLED
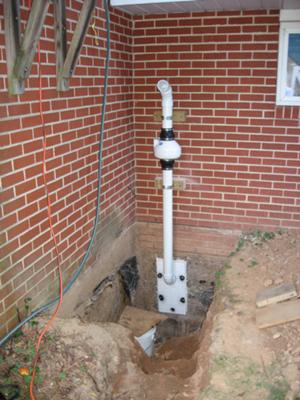
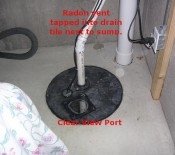
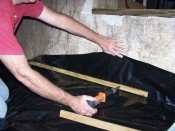
The pictures show the installation in various stages.
The original intention was to make a hole through the concrete block wall to access the underside of the slab, create a suction pit under the slab, and then seal the space between the suction pipe and the wall.
The hole was made, and a suction pit was scraped out. The slab had been poured over a plastic vapor barrier, which was laid over a layer of crushed rock with a large amount of fine material.
By chance, the thickness of the concrete block changed just where the penetration was made. This made it virtually impossible to seal the inner side of the concrete block around the suction pipe. After agonizing about this for a while, I realized that this was not needed. In fact, I realized that the most important function of the fan would be to take suction from the inside of the wall, which I became certain was the main route of entry for the radon. Suction under the slab was only secondary. Also, the break in block thickness allowed suction on the wall to transmit suction around the perimeter of the slab.
So, it was necessary only to seal the outside of the wall to the pipe. To do this, I made a mounting plate for the exterior pipe elbow. The plate is made of 3/4" PVC trim board, with a 3" elbow and pipe stub cemented to the plate with PVC cement. A 3" connector fitting is cemented to the pipe stub on the inside of the mounting plate, clamping the elbow in place. This provides adequate support for the weight of the discharge pipe and fan. The adapter plate is sealed to the wall with polyurethane caulk. It is bolted against the wall with stainless steel lag screws and zinc lag shields.
The usual installation approach through the floor slab would have been fairly easy in this situation. But, I wanted to avoid messing up the finished space. Also, it became clear that the concrete block wall was the primary route of radon entry, rather than the floor slab. The slab has no penetrations, and it would leak only around its perimeter.
RADON SUCTION PERFORMANCE
I have tested the radon installation for about three weeks now, using the Pro Series
The radon level in the room above the basement addition dropped to a low of 1.1 pC/l, but has crept up to 1.4 pC/l with heavy rain, and now with frozen ground.
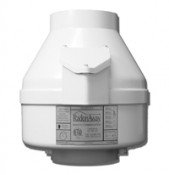
The RadonAway RP145 fan, which I selected based on your recommendation, appears to be right for the job. I checked its wattage with a real wattmeter (Kill-a-Watt), and it draws 73 watts. This is slightly higher than the top end of the power rating for this fan, which means that it is operating at maximum flow and pressure drop. The fan creates an amazingly strong discharge flow. I wonder where all that gas is coming from.
I did observe a significant flow of smoke into the interior insulation of the basement wall. The basement addition has glass fiber batts supported by a stud frame inside the block wall. I tested the smoke flow through a hole in the block wall where a flue is installed. So, it appears that there is major leakage from the concrete block wall into the insulation.
SUCCESS FACTORS
This was my first and only attempt at radon remediation. I attribute its success to learning from several good sources, including:
--- Kladder's book, which seems to be very well written and well organized
--- whatever was available on the Internet, including the EPA doctrine
--- Val's recommendations and comments, which were very helpful
--- the comments of a radon remediation contractor who works around the Westminster, Maryland area. (We know each other because we fly ultralights in the same club.)
Assessing the nature of the problem before starting work was important. Dumb luck was also a factor. My assumption about the problem being primarily in the concrete block wall turned out to be correct. However, if not, it would have been very difficult to seal the hole around the suction pipe to limit suction to the sub-slab space.
UNCONVENTIONAL FAN DISCHARGE
The conventional wisdom presently is that the radon fan should discharge above roof level. As you can see from the picture, the fan discharges low and horizontally. The discharge stream is projected well clear of the house, and thence toward downhill terrain. Having a short, smooth discharge pipe minimizes resistance to flow.
Also, in prior experience with laboratory buildings, I have found that heavy gases can fall from a roof right down to an air intake in the same building. So, I don't believe that my installation compromises safety. And, the radiation testing seems to support this.
I would like to hear your opinion about this.
A related question: I infer that the heaviness of the radon gas is responsible for the huge difference in radon level between the basement addition and the room above. But, is it true that radon tends to stratify in a house because of its weight?
RADON REDUCTION WITHOUT THE FAN
The work dragged out over several months. There was a period longer than a month, before the fan was installed, when the suction hole vented the sub-slab and the wall interior directly to the outside. During this period, I was able to close up the basement space and test the radon level. It dropped to only about 20 pC/l.
In other words, passively venting the foundation and sub-slab did not come close to solving the problem. The suction of the fan is essential.
Thanks Again,
DW in Maryland
Comments for Side Wall Radon Mitigation Technique in Maryland
|
||
|
||
|
||


